
Table of Contents
A camera that appears offline often needs a simple connection check before anything more complex. For troubleshooting CCTV connection issues, start by rebooting the router and camera, then check the Wi-Fi band: many wireless cameras use 2.4 GHz rather than 5 GHz. Keep the camera close to the router during setup, and inspect its cables and power supply if it still won’t connect.
It’s frustrating when a camera drops offline or its video keeps cutting out, especially when you rely on it for peace of mind. A weak Wi-Fi signal, loose cable or outdated firmware can disrupt the connection, but a few systematic checks can help narrow down the cause.
This guide explains how to connect a wireless camera to home Wi-Fi, check cables and firmware, and test another network to find out whether the issue lies with the camera or your network. You’ll also learn when to stop troubleshooting and call a CCTV engineer.
Key Takeaways
- Set up a wireless camera close to the router, allow 30-60 seconds for it to connect, then check signal strength at its intended position.
- Inspect cable connections for looseness or visible damage, and keep CCTV cabling away from electrical equipment and sources of interference.
- Test the camera on another Wi-Fi network or a mobile hotspot to help distinguish a camera fault from a home network problem.
- If several cameras fail together, consider shared equipment such as the power supply, recorder or network hardware; call an engineer if the cause is unclear or you’re uncomfortable troubleshooting.
- Check for firmware updates using the camera manufacturer’s instructions, as outdated firmware can contribute to video loss or motion detection problems.
How Do I Connect My Wireless Camera to My Home Wi-Fi?
Connect the camera through its app or setup interface, select the correct Wi-Fi band and enter the network password. Start near the router, then test the signal where you plan to install the camera. A methodical approach to troubleshooting CCTV connection issues can help isolate a setup, signal or network fault.
To restart a CCTV camera or NVR safely, use its normal restart control or power cycle rather than selecting factory reset. Before a factory reset, export important footage and note the settings: resetting restores the camera’s defaults and means you’ll need to configure it again.
Remote access can expose a camera if login details are weak, shared or entered into an untrusted app. Use the manufacturer’s genuine app, set a unique password and avoid changing router access settings unless you understand the security impact.
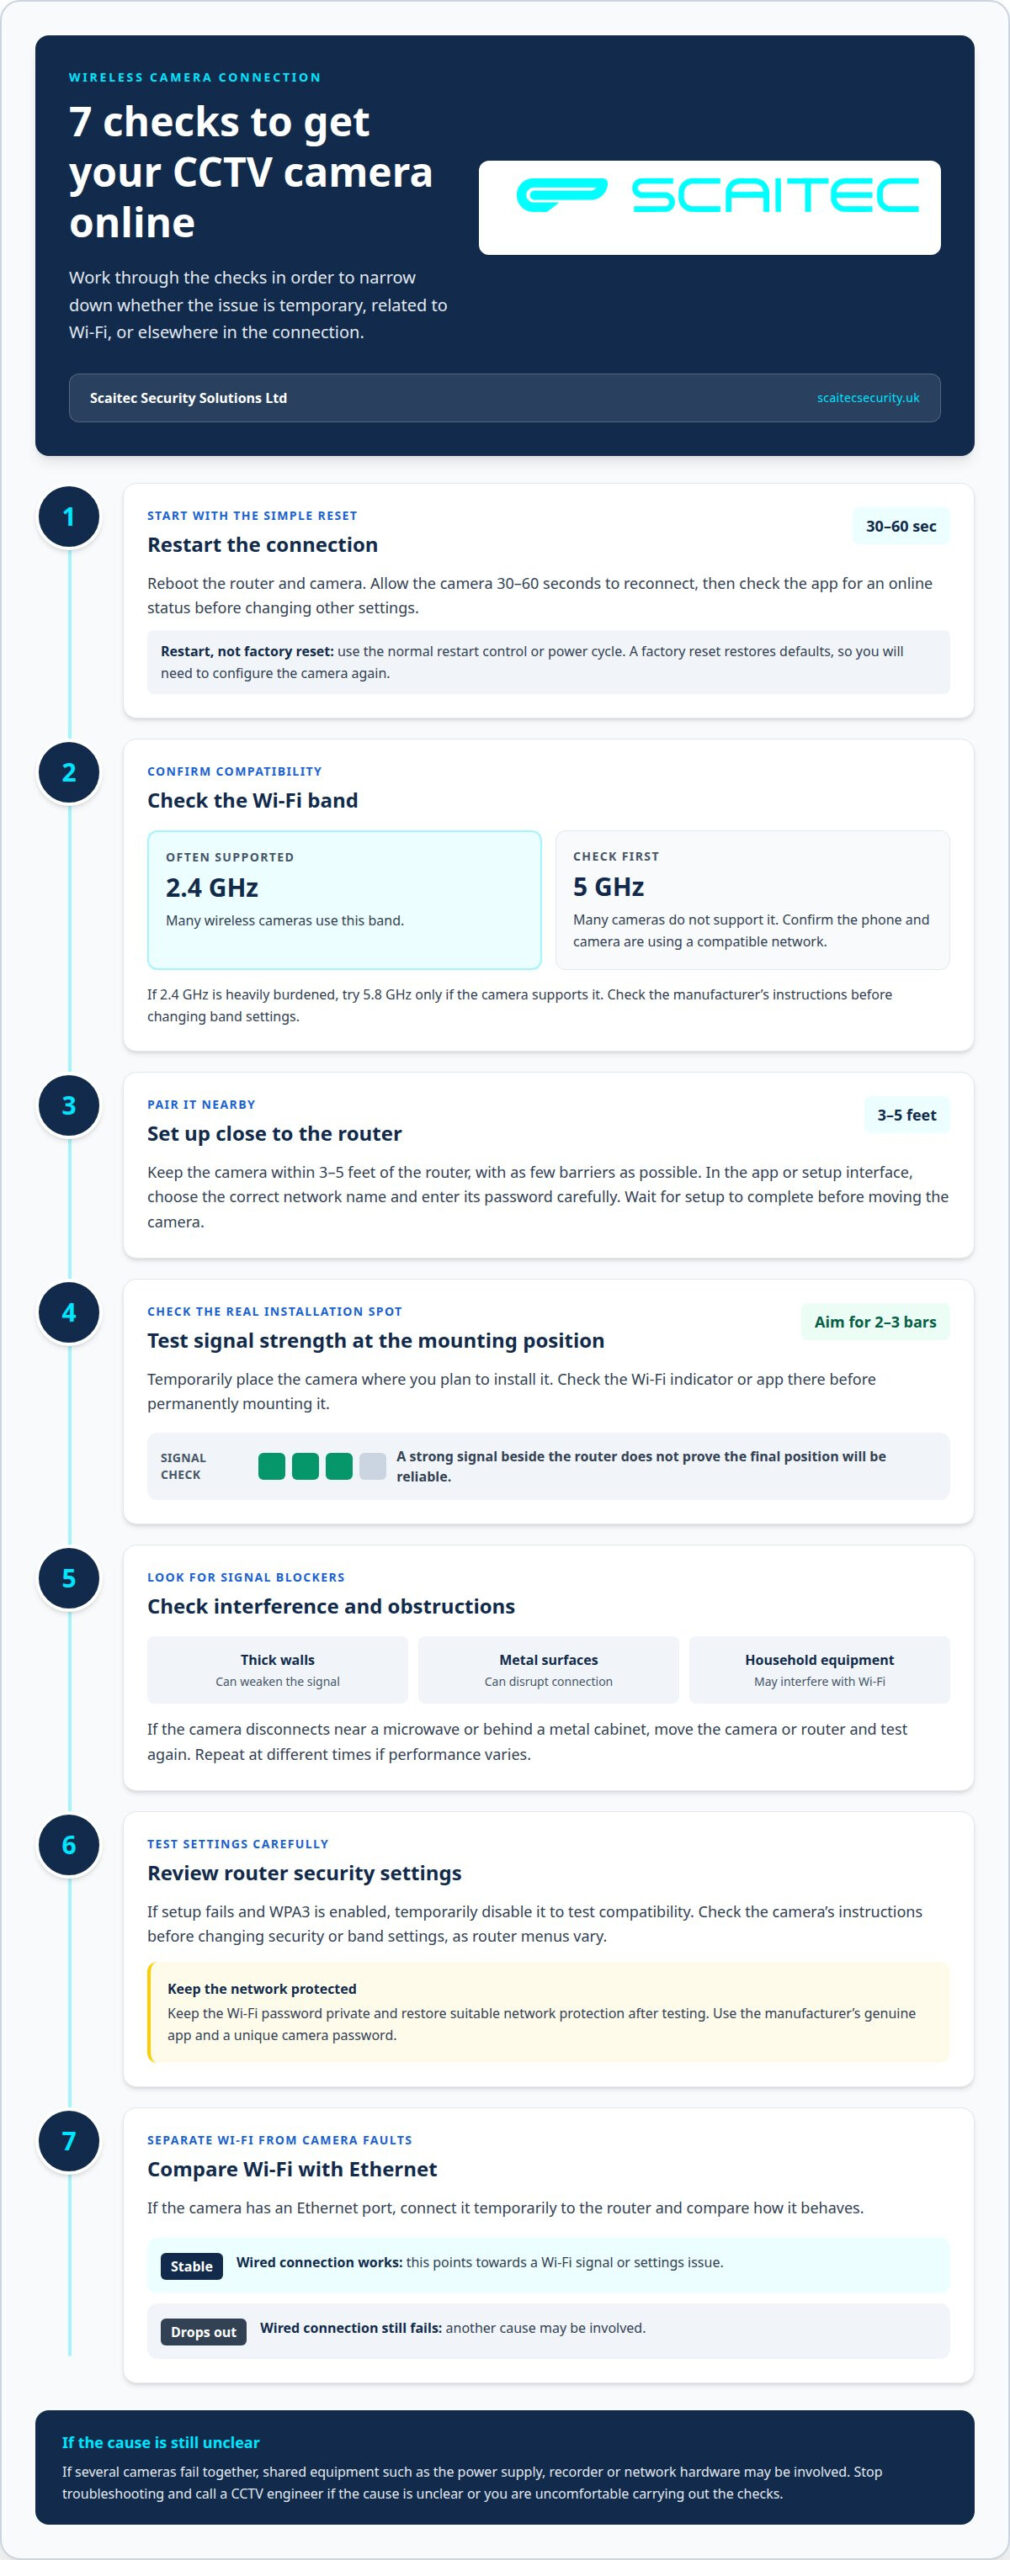
- Restart the connection. Reboot the router and camera, then allow 30-60 seconds for the camera to connect and register. Check its app for an online status before changing other settings. This can clear a temporary connection problem without altering the system configuration.
- Check the Wi-Fi band. Many wireless cameras support 2.4 GHz but not 5 GHz. During setup, confirm that your phone and camera are using a compatible network. If the 2.4 GHz band is heavily burdened, try 5.8 GHz only when the camera supports it.
- Pair the camera near the router. Keep it within 3-5 feet during initial setup, with as few barriers as possible. Select the correct network name in the camera’s settings, enter its password carefully, and wait for the connection to complete before moving the device.
- Test signal strength at the mounting position. Temporarily place the camera where you plan to install it and check its Wi-Fi indicator or app. Aim for at least 2-3 bars before permanent mounting. A strong signal beside the router doesn’t prove the final position will receive a reliable connection.
- Look for interference and obstructions. Thick walls, metal surfaces and household equipment can weaken or disrupt a wireless signal. If the camera disconnects near a microwave or behind a metal cabinet, move it or the router and test again. Repeat the test at different times if performance varies.
- Review router security settings. If setup fails and WPA3 is enabled, temporarily disable it to test compatibility. Keep the Wi-Fi password private and restore suitable network protection after testing. Check the camera’s instructions before changing security or band settings, as menus vary between routers.
- Compare Wi-Fi with Ethernet. If the camera has an Ethernet port, connect it temporarily to the router. A stable wired connection points towards a Wi-Fi signal or settings issue; continued dropouts suggest another cause. This final comparison can narrow down troubleshooting CCTV connection issues. Reviewing home CCTV system considerations can also help you plan the camera’s connection and position.
Cable routing, grounding and interference
If a camera is offline on the recorder, first check its Ethernet or video connection and confirm the cable is securely connected at both ends. If several cameras are offline together, inspect shared equipment such as the recorder, network switch or power supply.
-
Inspect wired cables for damage
Trace the cable from the CCTV camera to the recorder or network switch, looking for cuts, crushed sections, kinks and worn insulation. Check visible connectors and terminals too. A damaged cable or connector can interrupt the signal, causing a camera to drop out or disappear from recordings.
Keep the cable away from high-frequency equipment, including satellite transmitters, and don’t run it against electrical equipment. Twisted or sharply bent cable can weaken the signal or stop it altogether. If a section looks damaged, repositioning it is unlikely to be a lasting fix. The CCTV wiring may need replacing.
For a networked camera, Cat6 cable supports Gigabit over a maximum run length of 100 metres. Measure the route rather than the straight-line distance, as bends and detours add length. Check the cable type and routing against the manufacturer’s system requirements.
-
Check video feeds and cable connections
Compare the recorder’s live view with the physical connections. Confirm each cable is fully connected at the camera and the correct recorder input or network switch port. If only one camera has a frozen or missing feed, inspect its cable first, then test the connection at the recorder end.
Check the power cord as well as the video or Ethernet connector. A camera may appear online briefly if a connection is intermittent, then lose its feed when the cable shifts. Avoid pulling on the wire itself: hold the connector when checking that it is secure.
If the camera has a separate power supply, check that connection too. On a networked system, note which switch port serves the affected camera. This helps distinguish a fault with one camera’s cable from a problem affecting several connections.
-
Check cable terminations and recorder status
Inspect each cable termination for loose connectors, poor joints or visible wear. A cable tester can help identify crossed wires or loose connectors. Don’t remake a termination by guesswork: secure, correctly made connections matter for a stable signal, and CCTV cables should be correctly grounded.
Check the recorder’s camera list and channel status, then confirm the affected camera’s cable reaches the expected input. If one channel remains offline after you reconnect it, the fault may be in the cable, connector or camera. If several channels fail together, check shared equipment before treating each camera as a separate fault.
Recurring dropouts can point to worn cabling, faulty joints or poor terminations rather than a camera setting. CCTV system maintenance can address persistent connection faults through checks of connections and equipment.
Testing with an alternative Wi-Fi network or hotspot
Compare local viewing with remote access, then test the camera on another Wi-Fi network or mobile hotspot. If the camera works locally but remote viewing fails, investigate the router, internet connection, network settings or CCTV application.
-
Check bandwidth and network capacity
Check whether several live feeds or other network activity coincide with freezing or lag. A 4MP H.264 CCTV stream requires approximately 8 Mbps of network bandwidth per camera, so consider the combined demands of cameras streaming together. Actual requirements depend on the camera setup and stream settings.
Review the camera’s resolution and frame rate settings. Reducing either can lower bandwidth use and may improve a choppy stream. Change one setting at a time, then check the live feed and recorded footage. If several IP cameras freeze together, network congestion, insufficient bandwidth, faulty network equipment or poor-quality Ethernet cabling may be involved.
Test under the same conditions that usually cause the fault. For example, compare one camera’s stream with all cameras streaming. If one feed runs smoothly on its own but falters when other feeds start, the pattern points towards network capacity rather than an isolated camera fault. Include the recorder and network switch in your checks.
-
Isolate the source of the connection fault
Change one part of the connection at a time and note the result. First, check the camera’s local view through the recorder. If local footage works but remote access fails, focus on the router, internet connection, network configuration or CCTV application. If the local feed also fails, inspect the camera, recorder and physical network connection.
Next, test the camera on another Wi-Fi network or mobile hotspot. If it connects there, the original router or network settings are more likely to be involved. If it still fails, investigate the camera or its setup. Restore the original network after testing and record which connection and settings produced each result.
To distinguish a recorder fault from a camera fault, compare another camera on the same recorder or test the affected camera using its usual local viewing method. If several cameras lose connection at once, consider shared network or recording equipment. If only one camera fails, check its connection and configuration first.
Finally, note whether the problem began after a change to your broadband equipment or network settings. Replacing a router, for example, can affect remote access even when local viewing remains available. This step-by-step comparison helps identify whether the camera, recorder, router or internet service needs further attention.
When to call a professional CCTV engineer
Call an engineer when basic checks don’t identify the fault, several cameras fail together, or you’re unsure about inspecting powered equipment. A clear pattern, such as one camera failing while others work, helps narrow down the cause.
- Stop if you’re uncomfortable checking equipment. Don’t open a power supply, recorder or switch if you’re unsure how to inspect it safely. Note what the system is doing instead: for example, whether the camera has power, whether its recorder channel shows offline, and whether live footage works locally. These details help an engineer trace the fault.
- Call when multiple cameras stop at once. Simultaneous failures can point to shared equipment, such as the main power supply, PoE switch, recorder or network hardware. Avoid resetting each camera separately before checking the common connection. An engineer can assess the shared devices and identify whether one fault explains several cameras going offline.
- Arrange a professional inspection if the cause remains unclear. If a camera repeatedly disconnects after you’ve checked its visible connections and network status, the issue may involve cabling, the recorder or system configuration. Write down when the fault occurs and which cameras are affected. This gives the engineer a practical starting point rather than relying on repeated trial and error.
- Don’t keep repeating factory resets. A reset can return equipment to default settings and require reconfiguration, but it may not resolve the underlying fault. If the same camera goes offline again after setup, record the error message and any settings changed. A professional can investigate the root cause instead of relying on a temporary return to function.
- Escalate faults involving power or network equipment. If the recorder or switch appears not to power connected cameras, or several devices drop out together, avoid swapping power connections at random. Some PoE switches cannot supply 15 W to every port, and an overloaded switch may fail to power another camera. An engineer can check the equipment’s capacity and connections.
- Seek help before a fault leaves coverage gaps. An unresolved connection problem can stop cameras transmitting or recording footage. If you depend on a particular camera for an entrance or other important area, prioritise that fault and explain the affected view. A prompt diagnosis can help restore dependable operation and avoid more serious equipment problems.
Before the visit, gather the recorder’s status messages, the affected camera names and details of any recent changes to the router or installation. If the fault is unclear, professional CCTV troubleshooting can help pinpoint whether the issue lies with a camera, recorder, power supply or network connection.
Checking CCTV firmware updates
Outdated firmware can sometimes cause video loss or motion detection problems. Check each camera and recorder separately, because an update for one device may not suit another model.
- Identify the affected device and its current firmware. Open the camera or recorder settings and note its exact model and firmware version. If only one camera loses video, start with that device rather than changing every system setting. Record the version before making changes so you can compare it with the installed version afterwards.
- Use the manufacturer’s instructions to check for updates. Find the support information for the exact model and compare its listed firmware with the version shown in your settings. Similar model names may still require different software. Don’t install a file intended for another camera or recorder: incorrect firmware can stop a device functioning properly.
- Consider whether an update matches the fault. Firmware updates may address issues such as video loss or motion detection problems. If a camera’s connection drops but its cables and network appear sound, check whether the manufacturer describes a relevant fix. An update is not a substitute for inspecting a faulty cable, power supply or network connection.
- Prepare before starting the update. Note important camera settings and recording schedules, then follow the manufacturer’s process. Make sure the device has a stable power connection and network link. Don’t switch it off or disconnect cables during installation: interrupting the process can leave the camera or recorder unable to start correctly.
- Update one device at a time, then test it. Follow the on-screen instructions or the manufacturer’s update procedure. When the camera restarts, check its connection, live view, recording and motion detection. Confirm that a previously missing feed returns and that the recorder receives footage before moving on to another device.
- Review settings if the fault continues. Compare the camera’s current network and recording settings with your notes. Firmware changes can affect how a device behaves, so check whether a setting needs adjusting. If the same problem persists across a camera and recorder after a correctly completed update, don’t repeat updates or resets without identifying the cause.
If updates and basic checks don’t resolve recurring faults, a structured inspection can help distinguish firmware problems from faulty connections or equipment. Arrange CCTV system maintenance
Regular maintenance can help identify recurring faults. CCTV maintenance should include cleaning camera lenses and housings, checking and tightening connections, and updating firmware. If a camera will not turn on, check that its power outlet works and inspect the adapter for visible damage. For wireless cameras, check the battery level and whether the camera is receiving adequate power.
If CCTV works locally but remote viewing does not, first check whether the system operates correctly when viewed locally. To troubleshoot motion detection, adjust sensitivity and check that detection zones are configured properly. If footage is missing, check the recording schedule, hard-drive detection, available storage, recording settings, camera connection, and date and time settings.
Scaitec Security Solutions: CCTV Systems
Scaitec Security Solutions provides CCTV installation and maintenance for homes and businesses in Sheffield, Rotherham and South Yorkshire. If you can’t identify why a camera keeps disconnecting, or several devices are affected, Scaitec can assess the equipment, connections and setup together.
Turn to Scaitec Security Solutions Ltd when recurring faults persist after basic checks, or when you need a CCTV system designed, installed or maintained as part of your security arrangements. The right next step depends on whether the issue concerns an existing system or a new installation. CCTV can also sit alongside Intruder Alarms, Access Control Systems or Fire Alarm Systems where those meet your security needs.
Contact Scaitec Security Solutions Ltd to discuss your CCTV requirements, or visit scaitecsecurity.uk.
Take the next step towards dependable CCTV
A clear fault record can make your next decision easier. Note which cameras are affected, whether local viewing works and when the connection drops. This gives an engineer a useful starting point and helps you track whether the same issue returns after a change.
A methodical approach to troubleshooting CCTV connection issues can also show when the problem points to a wider system need. Scaitec Security Solutions provides CCTV alongside Intruder Alarms and Access Control, helping homes and businesses in Sheffield, Rotherham and South Yorkshire consider their security arrangements as a whole. If the fault persists or you’re unsure about changing equipment settings, professional support is a practical next step.
With a clear record and the right support, you can work towards a system you can rely on with greater confidence.
Frequently Asked Questions
Why Won’t My Security Camera Connect to My Wi-Fi?
A camera may reject the network if its Wi-Fi band, password or router settings don’t meet its requirements. Check the camera’s setup instructions, then confirm the selected network name and password. If your router combines bands under one network name, temporarily separate them in its settings if possible. Also check whether the camera is trying to join a guest network, which may restrict communication with other devices.
How to check PoE switches, network cables and IP address conflicts for CCTV
Check that the PoE switch can supply enough power to each camera; an overloaded switch or one unable to provide 15 W to every port may leave a camera without power. Inspect network cables and connections for looseness, damage or poor terminations, using a cable tester to check for crossed wires or loose connectors. Verify that IP cameras do not share the same IP address.
Protect Your Business
Protect Your People
Book Your FREE Site Protection Survey

Since pioneering Scaitec Security Solutions in 2005, Paul Scaife, with his roots in the industry dating back to 1994, has distinguished the firm as a leading provider of bespoke fire and security solutions, servicing clients across Sheffield, Rotherham, and surrounding areas.
His leadership, underpinned by accreditation from the Security Systems and Alarms Inspection Board, ensures that Scaitec surpasses client expectations by blending advanced technology with a deep understanding of their unique needs.
Paul's ethos champions innovation and efficiency, driving Scaitec to deliver tailored, cutting-edge solutions that enhance safety and operational ease.
Discover more about Paul’s commitment to excellence on LinkedIn.